![[ANSYS, Inc. Logo]](fluentlogo.gif)


|
|
|
The steps for recording an animation using ANSYS FLUENT are as follows:
Each step is described in detail in the following sections.
Create an Animation
When recording animations to video, you must first create your animation. It's also a good idea to play it back a couple times to make sure you are satisfied with it, and to save the animation key frame definitions to a file for later use (see Section 29.7.1).
When you are ready to record the animation, you can select Video in the Write/Record Format drop-down list found in the Animate dialog box. When you do so, the name of the Write... button will change to Record..., and you can click Record... to display the Video Control dialog box (Figure 29.8.3) used for video creation. This dialog box can also be displayed by selecting the Video Control... menu item in the Display pull-down menu.
Open a Connection to the VTR Controller
The steps for connecting to your VTR controller are as follows:
Set Up Your Recording Session
Once you have established a connection to the VTR controller, you can set up your recording session. There are three types of recording sessions, as described below:
|
|
Remember that when you preblack a previously formatted tape, a new time code will be written and any previously recorded video will be destroyed.
|
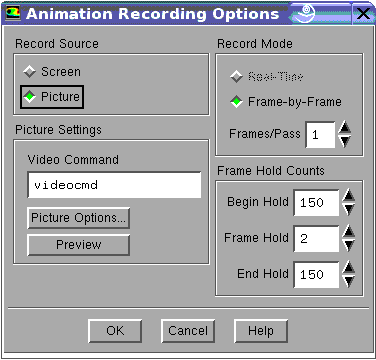
The Options... button in the Video Control dialog box is used to display the Animation Recording Options dialog box (Figure 29.8.4):
There are three parts to setting up your animation recording session:
Select the Recording Source
There are two possible video sources that can be used for recording an animation: Screen and Picture. The choice of video source depends on what your video hardware/software provides. Here is a description of each:
When using the picture option, a shell script will be called that will send the picture file to the video frame buffer. The default setting is videocmd, which is a shell script that is included in your ANSYS FLUENT distribution. It is located in path /Fluent.Inc/bin, where path is the folder in which you have placed the release folder, Fluent.Inc. This shell script will execute your system's command to send an image file to the video frame buffer. The script videocmd is set up to call the SGI system command memtovid. If you have a different system, you must copy the shell script videocmd to a new file and modify it to perform the proper task on your system (see the comments in videocmd for details). You can specify the name of your shell script using the Video Command text entry in the Animation Recording Options dialog box.
In order to send a picture file of the proper format to the video frame buffer, you must set up the picture format using the Save Picture dialog box, which can be displayed by clicking the Picture Options... button in the Animation Recording Options dialog box. If you choose to perform a window dump to create the picture file, the default window dump command used will also be videocmd. You can change this setting to use your own command. After setting the picture options, click Apply instead of Save... in the Save Picture dialog box to apply the change.
Once you have set up the picture format and system command, you can test the configuration by sending the picture in the current graphics window to the video frame buffer. This is done by clicking on Preview in the Animation Recording Options dialog box. (Note that this is another way to send a black video signal to your VTR when you are preblacking a tape).
Choose Real-Time or Frame-By-Frame Recording
There are two methods for recording an animation: real-time and frame-by-frame. These methods are described below:
When recording in frame-by-frame mode, there is an optional setting called Frames/Pass, which can be used to try and speed up the frame-by-frame recording process. It specifies the number of animation frames recorded to tape per record pass. If the animation is long enough (200 frames or more), you can try setting this value to 2 or higher. For example, if you set this value to 2 for a 202-frame animation, it will record animation frame 1 during the first pass, frames 2 and 102 during the second pass, frames 3 and 103 during the third pass, and so on. This is possible only if the animation frames can be rendered in time to be inserted onto the tape during a record pass, so use this setting with caution.
Set the Video Frame Hold Counts
The video standard NTSC has a frame rate of 30 frames/sec (and the PAL standard has a rate of 25 frames/sec). At the NTSC rate, a 150-frame animation will take only 5 seconds to play. To stretch out the animation, you can record the same animation frame over 2 or more video frames. This is done by setting video frame hold counts for the beginning, middle, and end of the animation, using the Animation Recording Options dialog box controls described below:
Check the Picture Quality
As described in Section 29.8.1, there are several sacrifices made when sending a computer image to video, including loss of color and resolution. Some steps can be taken to minimize the problem using the Picture Options dialog box (Figure 29.8.5). Display this dialog box by clicking the Picture... button in the Video Control dialog box.
Make Sure Your Tape is Formatted (Preblacked)
Before you can start the recording session, you need to make sure the tape has been preblacked with a time code or frame code. When you start with a brand new tape, you need to take time out and preblack the whole tape first. This can be done using the following steps:
Start the Recording Session
Make sure you have the proper recording session selected. If you are recording an animation, the Animation radio button should be selected.
To start recording onto tape, you must first go to the "in point'' on tape where you want the recording to begin. With a blank tape, it is important to start at about 20 seconds into the tape, so the VTR has a chance to preroll up to the in point. You can use the VTR button controls to position the tape, but an easier way to go to a certain point is to type the time code or frame code in the Time or Frame counter and press the <Enter> key. For example, a time code of 00:02:36:07 is 2 minutes, 36 seconds, and 7 frames. In order to go to this position on the tape, you can enter the time code as 2:36:07, leaving out the leading zeros, or you can simply enter 23607, leaving out the leading zeros and colons.
Once your tape is at the start position for your recording session, click the Record button to start recording.
Previous:
29.8.2 Equipment Required