The
Display/Video Control... menu item opens the
Video Control dialog box (Linux/UNIX only).
Video Control Dialog Box
The
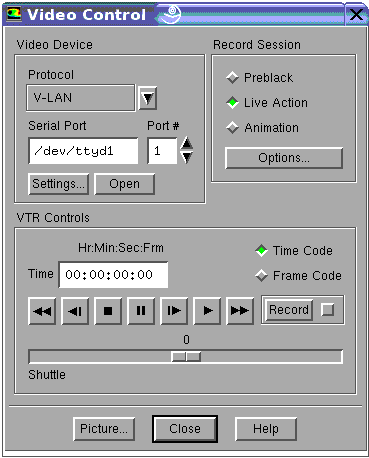
Video Control dialog box is used to record animations or live action to video. When recording animations to video, you must first create your animation (see Section
29.7.1). The
Video Control dialog box will play your animation and control a videotape recorder (VTR) to record it to video. See Section
29.8 for details about using the video tools.
Controls
Video Device
sets up the connection to the VTR control hardware.
Protocol
specifies the command protocol that identifies your VTR controller.
ANSYS FLUENT currently supports the following VTR controllers:
V-LAN
Machine Control Network is a command protocol developed by Videomedia, Inc. and supported by several videotape editing systems.
MiniVAS
is the command protocol for the MiniVAS and MiniVAS-2 VTR controllers developed by the V.A.S. Group.
To be able to control the video recording from
ANSYS FLUENT, your VTR controller must use one of these protocols.
Serial Port
identifies the name of the serial port to which your VTR controller is connected.
Port #
is a convenient way of changing the port number associated with the serial port.
Settings...
displays a dialog box that provides options specific to your VTR controller. If your VTR controller protocol is V-LAN, the
V-LAN Settings dialog box is displayed; if the protocol is MiniVAS, the
MiniVAS Settings dialog box is displayed.
Open
will open a connection to your VTR controller. Once the connection is open, the name of this push button will be changed to
Close so that you can close the connection again.
Record Session
specifies the type of recording you want to perform.
Preblack
is the process of formatting a tape by laying down a time code onto the tape. A tape must be formatted before any frame accurate editing, including frame-by-frame animation, can be performed. During this process, one usually records a black video signal onto the tape as well, thus the name "preblack''. When you select this option the current graphics window will be cleared to black. You can use the window to send your black video signal to the VTR. Remember, when you preblack a previously formatted tape, a new time code will be written and any previously recorded video will be destroyed.
Live Action
allows you to record a live
ANSYS FLUENT session which can be used for demonstration. This option requires your computer's video hardware to have a scan converter that will send the computer display image to your VTR system.
Animation
will play an animation that you have created, and record it onto your VTR system.
VTR Controls
function like the controls on your VTR's front dialog box.
Time
is a counter that provides input/output of the current tape position. It will update automatically when the tape is repositioned. If you type a new time in this field and press
Enter, the VTR will go to that position on the tape. For time code, the format is Hrs:Min:Sec:Frames, where the number of frames can range between 0 and 29. For example, a time code of
00:02:36:07 is 2 minutes, 36 seconds, and 7 frames. In order to go to this position on the tape, you can enter the time code as
2:36:07, leaving out the leading zeros, or you can simply enter
23607, leaving out the leading zeros and colons. If you select the
Frame Code radio button, the tape position will be displayed in frames instead of time.
Record
will begin a recording session starting at the current position on the tape. If
Preblack has been selected as the recording session, the label of this push button will be changed to
Preblack.
Push Button Controls
enable you to operate the VTR's tape transport.
<<
rewinds the tape.
<|
reverses the tape by one frame.
[]
places the tape in stop mode.
||
places the tape in pause mode.
>|
advances the tape by one frame.
>
plays the tape at normal speed.
>>
advances the tape in fast-forward mode.
Shuttle
allows you to advance (or reverse) the tape at varying speeds. When you move the shuttle to the right, the tape will be advanced; when you move it to the left, the tape will be reversed. The shuttle speed index ranges from -9 to 9. A speed index of 5 is equivalent to playing the tape at normal speed. A speed index of 0 is equivalent placing the tape in pause mode.
Counter Format
allows you to change the counter units displayed in the
Time/Frame counter.
Time Code
when selected, displays the tape position as time code.
Frame Code
when selected, displays the tape position as frame code.
This format is for display/user-input purposes only and does not change the actual tape counter format.
Picture...
displays the
Picture Options dialog box, which provides options for setting the picture size and color levels in the graphics window.
V-LAN Settings Dialog Box
The
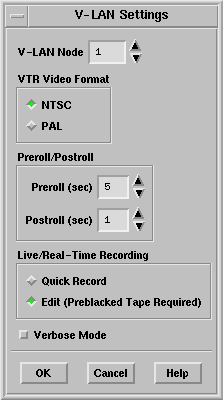
V-LAN Settings dialog box allows you to set specific V-LAN options. This dialog box is displayed by clicking on the
Settings... push button in the
Video Control dialog box, after you have selected V-LAN as your video device protocol.
Controls
V-LAN Node
identifies the node number of the VTR. This is always 1, unless you have several video devices connected to a V-LAN network, in which case, the VTR you want to use may be identified by another node number.
VTR Video Format
identifies the video format standard to which your VTR conforms. This setting is used to determine the video frame rate (frames/sec).
NTSC
(National Television Standards Committee) is the main video standard used in North America and Japan. The video frame rate is 30 frames/sec.
PAL
(Phase Alternate Line) is the video standard used by some countries in Western Europe, Asia, and Australia. The video frame rate is 25 frames/sec.
Preroll/Postroll
specifies the preroll and postroll times in seconds. These are used when performing
Edit records, including frame-by-frame animation recording, to make sure the tape is moving at the proper speed through the recorded segment.
Preroll
is the number of seconds the tape will play up to the record in point.
Postroll
is the number of seconds the tape will play past the record out point.
The default settings should be sufficient for most VTR devices.
Live/Real-Time Recording
specifies the type of recording that will be performed during a live action or real-time animation recording session.
Quick Record
can be performed on a tape that has not been formatted or "preblacked''. This is also known as "full record''. Remember that this option will destroy any pre-existing time code on the tape.
Edit (Preblacked Tape Required)
is used for more precise recording. This mode allows you to record several back-to-back recordings with clean transitions between them.
For frame-by-frame animation recording, the record mode used is
Edit regardless of this setting.
Verbose Mode
enables the echoing of each V-LAN command as it is sent to the V-LAN controller.
MiniVAS Settings Dialog Box
The
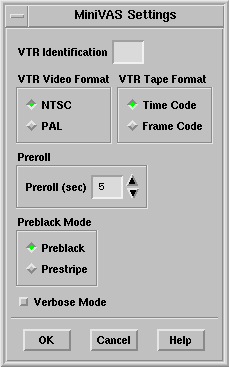
MiniVAS Settings dialog box allows you to set specific MiniVAS options. This dialog box is displayed by clicking on the
Settings... push button in the
Video Control dialog box, after you have selected MiniVAS as your video device protocol.
Controls
VTR Identification
identifies the type of VTR the MiniVAS is connected to. The identification is a two-character code reserved for your VTR model (see your MiniVAS documentation for details). If left blank, this field is ignored and the MiniVAS will use the code that has been permanently stored in its ROM. It is recommended that you leave this field blank unless you know that a code change is required. If you open this dialog box after opening a connection to the MiniVAS, this field will contain the code that is stored in the MiniVAS.
VTR Video Format
identifies the video format standard to which your VTR conforms. This setting is used to determine the video frame rate (frames/sec).
NTSC
(National Television Standards Committee) is the main video format used in North America and Japan. The video frame rate is 30 frames/sec.
PAL
(Phase Alternate Line) is the video format used by some countries in Western Europe, Asia, and Australia. The video frame rate is 25 frames/sec.
VTR Tape Format
specifies which counter format to use for editing. MiniVAS provides commands based on both time code and frame code.
Time Code
instructs MiniVAS to control the VTR using time code.
Frame Code
instructs MiniVAS to control the VTR using frame code.
Preroll
specifies the preroll time in seconds. This is used when performing
Edit records, including frame-by-frame animation recording, to make sure the tape is moving at the proper speed through the recorded segment. The value given is the number of seconds the tape will play up to the record in point. The default setting should be sufficient for most VTR devices.
Preblack Mode
specifies the mode used when you perform a preblack recording session.
Preblack
instructs the MiniVAS to perform a "hard'' record on a previously unformatted tape. During this operation, the MiniVAS will command the VTR to write both a time code and a VIFC frame code to the tape.
Prestripe
instructs the MiniVAS to perform an "edit'' record on a previously formatted tape that already has a time code. During this operation, the MiniVAS will command the VTR to write a VIFC frame code to the tape.
In either case, any previously recorded video will be destroyed.
Verbose Mode
enables the echoing of each MiniVAS command as it is sent to the MiniVAS controller.
Animation Recording Options Dialog Box
The
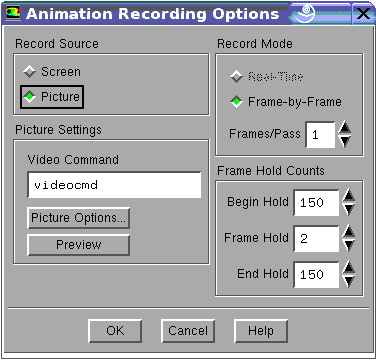
Animation Recording Options dialog box allows you to set specific options for recording animations to video. An animation is created using the
Animate dialog box.
Controls
Record Source
identifies the video source used during a recording session.
Screen
informs
ANSYS FLUENT that the computer's video hardware will send all or a portion of the computer screen as a video signal to the VTR. This option assumes your computer's video system includes a scan converter and associated software that converts the computer RGB signal to a video signal. You are responsible for setting up the scan converter and sending the video signal to the VTR.
Picture
instructs
ANSYS FLUENT to create a picture of each frame of animation and send the picture file to the computer's video hardware using a system command. This option assumes that your computer's video system includes a frame buffer that can store an image and send it as a video signal to the video recording system.
Picture Settings
is used in conjunction with the
Picture record source option.
Video Command
identifies the shell script command file used to send a picture file to the video frame buffer. The default setting is
videocmd, which is a shell script that is included in your
ANSYS FLUENT distribution. It is located in
path/Fluent.Inc/bin, where
path is the directory in which you have placed the release directory,
Fluent.Inc. This shell script will execute your system's command to send an image file to the video frame buffer. The script
videocmd is set up to call the SGI system command
memtovid. If you have a different system, you must copy the shell script
videocmd to a new file and modify it to perform the proper task on your system (see the comments in
videocmd for details).
Picture Options...
displays the
Save Picture dialog box, which allows you to set up the picture format supported by your video frame buffer. If you choose to perform a window dump to create the picture file, the default window dump command used will also be
videocmd. You can change this setting to use your own command. After setting the picture options, click on
Apply instead of
Save... in the
Save Picture dialog box to effect the change.
Preview
will send a test picture of the current graphics picture to the video frame buffer. This can be used to check the image on your video recording system's monitor to see if the image size and color levels are acceptable.
Record Mode
specifies the method used to record the animation.
Real-Time
can be used if the animation playback speed is fast enough to provide a reasonably smooth animation in real-time. This is only available if the selected record source is
Screen. In this mode,
ANSYS FLUENT will simply turn VTR recording on, play the animation, then stop the recording.
Frame-By-Frame
is used to produce a higher-quality video animation by recording one frame at a time. For each animation frame, this method will 1) play the frame on the screen (and generate the picture file, if needed), 2) preroll the VTR, and 3) record the frame. If the animation has 50 frames, this procedure is repeated 50 times, i.e., 50 record passes are made. This is the recommended method, because the real-time playback of the animation will usually be too slow and choppy.
Frames/Pass
is used in conjunction with
Frame-By-Frame recording to try and speed up this process, if possible. It specifies the number of animation frames recorded to tape per record pass. If the animation is long enough (200 frames or more), you can try setting this value to 2 or higher. For example, if you set this value to 2 for a 202-frame animation, it will record animation frame 1 during the first pass, frames 2 and 102 during the second pass, frames 3 and 103 during the third pass, and so on. This is possible only if the animation frames can be rendered in time to be inserted onto the tape during a record pass, so use this setting with caution.
Frame Hold Counts
specifies the number of video frames to hold an animation frame during recording. The video standard NTSC has a frame rate of 30 frames/sec. At that rate, a 150-frame animation will take only 5 seconds to play. To stretch out the animation, you can record the same animation frame over 2 or more video frames.
Begin Hold
specifies the number of video frames to hold the first animation frame. It helps to hold the first frame for about 5 seconds (150 video frames) so that the viewer can get accustomed to the picture before the animation begins.
Frame Hold
specifies the number of video frames to hold each animation frame, other than the first and last. To slow down your recorded animation, try setting this value to 2 or 3.
End Hold
specifies the number of video frames to hold the last animation frame. You may want to hold the last animation frame for about 5 seconds to provide closure.
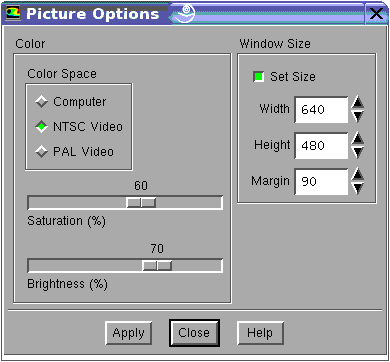
Picture Options Dialog Box
The
Picture Options dialog box allows you to adjust the color levels and size of the picture in the graphics window. This dialog box has an
Apply push button, so as you adjust levels, you can click on
Apply to see the effect on the picture in the current graphics window. Each option has a presetting, so you can click on
Apply immediately to see the effect of the presettings.
Controls
Color
contains options for adjusting the color levels of the picture.
Color Space
lets you choose a filter that will restrict all colors to within a particular color range by modifying individual color values, if needed.
Computer
when selected, effectively turns off color filtering.
NTSC Video
when selected, restricts colors to the NTSC color space. NTSC (National Television Standards Committee) is the main video format used in North America and Japan.
PAL Video
when selected, restricts colors to the PAL color space. PAL (Phase Alternate Line) is the video format used by some countries in Western Europe, Asia, and Australia.
Saturation (%)
controls the percentage of color saturation (or purity) of the colors in the picture. A saturation in the range of 0-20% produces grayed-out colors. A saturation in the range of 40-60% produces pastel colors. A saturation in the range of 80-100% produces vivid colors. For video, this value should be no more than 80%.
Brightness (%)
controls the color brightness of the picture. When lowering the saturation, it is often desirable to lower the brightness a little bit as well to avoid pastel colors.
Window Size
allows you to resize the graphics window so that you can match up the size to your VTR device.
Set Size
lets you decide whether or not you want the
Width,
Height, and
Margin values to be used to resize the graphics window.
Width
specifies the width in pixels of the new window size.
Height
specifies the height in pixels of the new window size.
Margin
specifies a margin in pixels to create around the picture. This can help you produce a video image that does not include unwanted parts of the screen, such as the window border.
![[ANSYS, Inc. Logo]](fluentlogo.gif)