Graphics windows display the program's graphical output, and may be viewed within the
FLUENT application window or in separate windows. The decision to embed the graphics window or to have floating graphics windows is made when you start
ANSYS FLUENT using
FLUENT Launcher. For information about
FLUENT Launcher, refer to Section
1.1.2. When viewed within the application window, the graphics windows will be placed below the toolbar on the right, as shown in Figure
2.1.1.
Figure 2.1.9: Displaying Two Graphics Windows
In Figure
2.1.9, two graphics windows are displayed by selecting the menu item
View/Graphics Window Layout, then selecting
. Although this setup only allows two windows to be visible at a given time, any number of graphics windows can be created. You can select any existing graphics window to be displayed in either location through the drop-down menu, which appears in the top left corner of the embedded graphics window. This drop-down displays the title of the window.
You can change the text that appears in the graphics window title section by simply clicking in the area and editing it as you would in a text editor.
The
Display Options dialog box can be used to change the attributes of the graphics window or to open another graphics window. The
Mouse Buttons dialog box can be used to set the action taken when a mouse button is pressed in the graphics window.
To cancel
a display operation, press
<Ctrl-C> while the data is being processed in preparation for graphical display. You cannot cancel the operation after the program begins to draw in the graphics window.
For Windows systems, there are special
features for printing the contents of the graphics window directly. These features are not available on UNIX systems.
Printing the Contents of the Graphics Window (Windows Systems Only)
If you are using the Windows version of
ANSYS FLUENTwith free floating graphics windows (i.e., they are not embedded in the application window), you can display the graphics window's system menu by clicking in the upper-left corner of the graphics window. This menu contains the usual system commands, such as move, size, and close. Along with the system commands,
ANSYS FLUENT includes three commands in the menu for printer and clipboard support. These commands are described below:
Page Setup...
displays the
Page Setup dialog box (see Section
2.1.7), which allows you to change attributes of the picture copied to the clipboard, or sent to a printer. Further details about this dialog box are included in the following section.
Print...
displays the
Microsoft WindowsPrint dialog box (see Section
2.1.7), which enables you to send a copy of the picture to a printer. Some attributes of the copied picture can be changed using the
Page Setup dialog box (see Section
2.1.7). Still more attributes of the final print can be specified within the
Microsoft WindowsPrint and
Print Setup dialog boxes (see documentation for
Microsoft Windows and your printer for details).
Copy to Clipboard
places a copy of the current picture into the
Microsoft Windows clipboard. Some attributes of the copied picture can be changed using the
Page Setup dialog box (see Section
2.1.7). The size of your graphics window affects the size of the text fonts used in the picture. For best results, experiment with the graphics window size and examine the resulting clipboard picture using the Windows clipboard viewer.
Using the
Page Setup Dialog Box (Windows Systems Only)
To open the
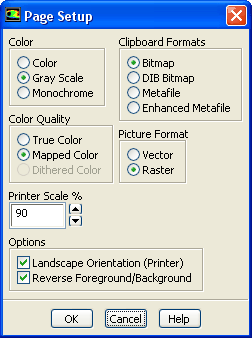
Page Setup dialog box (see Section
2.1.7) (Figure
2.1.10), select the
Page Setup... menu item in the system menu of the graphics window.
Figure 2.1.10: The
Page Setup Dialog Box (Windows Systems Only)
Controls
Color
allows you to specify a color or non-color picture.
Color
selects a color picture.
Gray Scale
selects a gray-scale picture.
Monochrome
selects a black-and-white picture.
Color Quality
allows you to specify the color mode used for the picture.
True Color
creates a picture defined by RGB values. This assumes that your printer or display has at least 65536 colors, or "unlimited colors''.
Mapped Color
creates a picture that uses a colormap. This is the right choice for devices that have 256 colors.
Clipboard Formats
allows you to choose the desired format copied to the clipboard. The size of your graphics window can affect the size of the clipboard picture. For best results, experiment with the graphics window size and examine the resulting clipboard picture using the Windows clipboard viewer.
Bitmap
is a bitmap copy of the graphics window.
DIB Bitmap
is a device-independent bitmap copy of the graphics window.
Metafile
is a Windows Metafile.
Enhanced Metafile
is a Windows Enhanced Metafile.
Picture Format
allows you to specify a raster or a vector picture.
Vector
creates a vector picture. This format will have a higher resolution when printed, but some large 3D pictures may take a long time to print.
Raster
creates a raster picture. This format will have a lower resolution when printed, but some large 3D pictures may take much less time to print.
Printer Scale %
controls the amount of the page that the printed picture will cover. Decreasing the scaling will effectively increase the margin between the picture and the edge of the paper.
Options
contains options that control other attributes of the picture.
Landscape Orientation (Printer)
specifies the orientation of the picture. If selected, the picture is made in landscape mode; otherwise, it is made in portrait mode. This option is applicable only when printing.
Reverse Foreground/Background
specifies that the foreground and background colors of the picture will be swapped. This feature allows you to make a copy of the picture with a white background and a black foreground, while the graphics window is displayed with a black background and white foreground.
![[ANSYS, Inc. Logo]](fluentlogo.gif)


 . Although this setup only allows two windows to be visible at a given time, any number of graphics windows can be created. You can select any existing graphics window to be displayed in either location through the drop-down menu, which appears in the top left corner of the embedded graphics window. This drop-down displays the title of the window.